Sitting for eight hours a day in the wrong chair isn’t just uncomfortable, it’s a setup for chronic lower back pain, shoulder tension, and poor posture that’ll haunt you long after the workday ends. If someone’s home office chair came free with a desk bundle or migrated from the dining room, there’s a good chance their spine is paying the price. The right back support office chair doesn’t just make work tolerable: it actively prevents the kind of musculoskeletal issues that lead to doctor visits and lost productivity. This guide cuts through the marketing hype to identify what actually matters in ergonomic seating and which chairs deliver genuine lumbar support without requiring a second mortgage.
Table of Contents
ToggleKey Takeaways
- A best back support office chair with adjustable lumbar support is essential for preventing chronic lower back pain and maintaining spinal alignment during 8+ hour workdays.
- Proper ergonomic features—including height and depth-adjustable lumbar support, seat depth adjustment, and 4D-adjustable armrests—distinguish chairs that genuinely support your spine from marketing hype.
- Budget-friendly options like the HON Ignition 2.0 ($290) and Alera Elusion Series ($230) deliver functional ergonomic support without a premium price, while premium chairs like the Herman Miller Aeron ($1,400-$1,800) offer 10-15 year durability and cost roughly $10-$12 per month over their lifespan.
- Correct chair setup—adjusting seat height, depth, lumbar position, armrests, and recline tension—takes only 10 minutes and is critical for maximizing the benefits of any back support office chair.
- The waterfall edge seat design, high-density foam (at least 2.5 lbs per cubic foot), and mesh backs reduce pressure points and heat buildup, preventing the discomfort and circulation issues caused by poor seat design.
- Pairing your office chair setup with proper monitor height (20-28 inches away, top edge at or below eye level) prevents forward head posture and ensures your back support investment delivers full postural benefits.
Why Proper Back Support Matters for Your Home Office
The human spine isn’t designed for prolonged sitting. Its natural S-curve, cervical, thoracic, and lumbar regions, needs support to maintain alignment when gravity and poor posture conspire against it. Without adequate lumbar support, the lower back flattens into a C-shape, compressing spinal discs and straining the erector spinae muscles.
Over weeks and months, this leads to disc herniation risk, sciatic nerve irritation, and chronic pain that radiates into the hips and legs. A 2023 study from the American Chiropractic Association found that 80% of remote workers reported back pain directly linked to inadequate seating. That’s not a comfort issue, it’s a structural one.
Proper ergonomic seating redistributes weight across the seat pan and backrest, maintaining the spine’s natural lordotic curve in the lumbar region. This reduces pressure on the L4-L5 and L5-S1 discs, the most common sites of herniation. For anyone spending more than four hours a day at a desk, an office chair with adjustable lumbar support isn’t a luxury: it’s preventive maintenance for the skeletal system.
Home offices present unique challenges. Unlike corporate environments with facilities teams and ergonomic assessments, remote workers often cobble together workspaces in spare bedrooms or kitchen corners. The chair becomes the single most critical piece of equipment, more important than the monitor or keyboard. Skimping here is like framing a wall with warped studs, everything built on top of it will suffer.
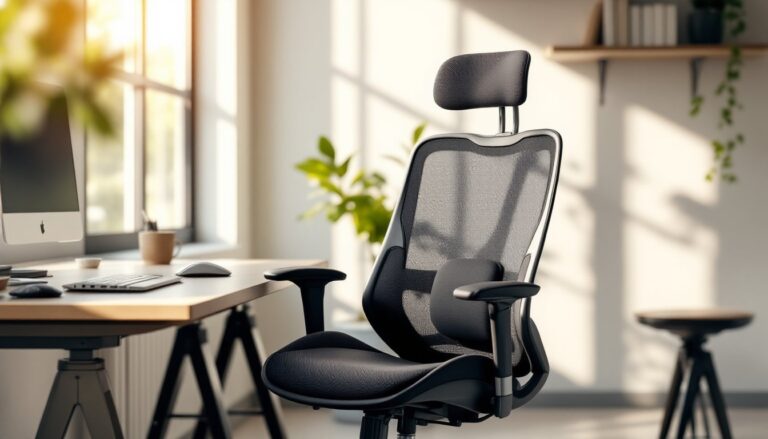
Key Features to Look for in a Back Support Office Chair
Not all “ergonomic” chairs are created equal. Marketing departments love slapping that label on anything with mesh fabric and a gas lift. Here’s what actually supports the spine.
Lumbar Support and Adjustability
Adjustable lumbar support is non-negotiable. The lumbar region sits roughly 8 to 10 inches above the seat pan for most adults, but torso length varies widely. Fixed lumbar pads often miss the mark entirely, hitting the mid-back or sacrum instead of the L3-L5 vertebrae where support is needed.
Look for chairs with both height and depth adjustment for the lumbar mechanism. Height adjustment moves the support pad vertically to align with the user’s natural curve. Depth adjustment (sometimes called lumbar firmness) pushes the pad forward into the lower back or retracts it for less pressure. Budget chairs often skip depth adjustment: mid-range and premium models include it.
Dynamic lumbar support goes a step further. Systems like those found in higher-end ergonomic chairs use flexible panels or air bladders that respond to movement, maintaining contact with the spine as the user leans back or shifts position. This is especially valuable for people who alternate between focused desk work and reclining during video calls.
Backrest recline tension is equally important. A mechanism that’s too stiff forces the user to perch forward: too loose and they’re constantly fighting to stay upright. Most quality chairs use a tilt tension knob below the seat that adjusts resistance based on body weight. Set it so reclining requires slight effort but doesn’t feel locked in place.
Seat Depth, Material, and Ergonomic Design
Seat depth (front-to-back measurement) should allow 2 to 4 inches of clearance between the seat edge and the back of the knees. Too shallow and the thighs lose support: too deep and the seat pan presses into the popliteal artery behind the knee, restricting circulation and causing numbness.
Look for seat depth adjustment via a sliding mechanism. Users with shorter legs (under 5’4″) or longer legs (over 6’2″) will struggle with fixed-depth chairs. The adjustment range typically spans 2 to 3 inches, enough to accommodate most body types.
Seat material impacts comfort over long sessions. Mesh seats promote airflow and prevent heat buildup, but they can feel too firm for some users. High-density foam (at least 2.5 lbs per cubic foot) provides cushioning without bottoming out after a few months. Avoid chairs with thin, soft foam that compresses quickly, they’ll feel comfortable in the showroom but fail within a year.
The waterfall edge, a downward slope at the front of the seat pan, reduces pressure on the thighs and prevents the seat from cutting into circulation. Flat or upward-angled seat edges cause discomfort during extended sitting.
Armrests deserve attention. Adjustable armrests (height, width, depth, and angle) allow the user to support their forearms while keeping shoulders relaxed. Fixed armrests often force the shoulders into elevation or prevent the chair from sliding under the desk. For best home office setups, 4D-adjustable armrests are worth the upgrade, they prevent the forward head posture and shoulder tension that plague keyboard-heavy work.
Top Budget-Friendly Back Support Chairs for Home Offices
Quality lumbar support doesn’t require a four-figure investment. Several manufacturers offer genuine ergonomic features in the $150 to $350 range, though buyers should calibrate expectations around build quality and adjustability.
Alera Elusion Series chairs (around $230) include adjustable lumbar support, seat depth adjustment, and a synchro-tilt mechanism that reclines the backrest at a 2:1 ratio to the seat pan. The mesh back promotes airflow, and the cushioned seat uses medium-density foam. It won’t outlast a Herman Miller, but for home offices with moderate use (4 to 6 hours daily), it delivers functional ergonomics without the premium price.
HON Ignition 2.0 (roughly $290) offers height- and depth-adjustable lumbar support, 4-way adjustable arms, and a weight capacity of 300 lbs. The build quality feels more substantial than entry-level big-box chairs, and replacement parts are available if the gas lift or casters fail. It’s a solid choice for anyone assembling a workspace on a budget who still wants proper spinal alignment.
For truly tight budgets, the Staples Hyken Mesh Task Chair (often under $150 on sale) provides basic adjustable lumbar support and a breathable mesh back. The armrests are fixed, and the tilt mechanism is simpler than higher-tier models, but it’s a significant step up from a kitchen chair or a hand-me-down office castoff. Think of it as the circular saw equivalent in the chair world, not the premium tool, but adequate for the task.
Budget chairs typically sacrifice durability and fine-tuning adjustments. Gas lifts may lose pressure after 18 to 24 months, and plastic components can crack under heavy use. Still, many DIY enthusiasts building out workshop furniture plans find these models provide adequate support while they allocate funds toward tools and materials for other projects.
Premium Ergonomic Chairs Worth the Investment
Premium chairs aren’t about luxury, they’re engineered systems designed to support 8-plus-hour workdays over 10 to 15 years. The cost-per-use calculation shifts dramatically when a chair lasts a decade instead of needing replacement every two years.
Herman Miller Aeron remains the benchmark for ergonomic seating, even though being introduced in 1994. The PostureFit SL lumbar system uses adjustable pads that support both the lower back and the sacrum, maintaining the spine’s natural curve without feeling intrusive. The 8Z Pellicle mesh suspension eliminates pressure points and heat buildup. Sizes A, B, and C accommodate different body types, critical for proper fit. Expect to pay $1,400 to $1,800 depending on configuration.
The 12-year warranty isn’t marketing fluff. Herman Miller honors it, and the chair’s modular design means nearly every component can be replaced. For someone working from home permanently, that’s roughly $10 to $12 per month over the chair’s lifespan, less than most people spend on coffee.
Steelcase Leap V2 (around $1,000 to $1,300) takes a different approach with LiveBack technology that changes shape as the user reclines, maintaining lumbar support throughout the full range of motion. The seat glides forward when reclining, reducing pressure on the thighs. 4D adjustable arms and customizable upholstery make it suitable for diverse body types and work styles.
Haworth Fern (approximately $900 to $1,100) offers a more design-forward aesthetic without sacrificing function. The wave suspension backrest flexes independently to support lateral movement, useful for anyone who shifts position frequently. Its smaller footprint fits tighter home office spaces better than the Aeron’s wider frame. Contemporary design-focused spaces often feature the Fern for its clean lines and material quality.
Premium chairs share common traits: extensive adjustability (8+ points of adjustment), high weight capacities (300 to 350 lbs), replaceable components, and long warranties (10 to 12 years). They’re also heavier, 30 to 50 lbs versus 20 to 30 lbs for budget models, due to metal frames and denser materials. That weight translates to stability and longevity.
How to Set Up Your Chair for Maximum Back Support
Even the best chair fails if it’s not adjusted correctly. Proper setup takes 10 minutes and prevents months of cumulative strain.
Step 1: Adjust seat height. Feet should rest flat on the floor with knees at a 90-degree angle. Thighs should be parallel to the floor or angled slightly downward. If the desk is too high and raising the seat causes the feet to dangle, add a footrest (a simple wood platform works, doesn’t need to be a commercial product). The goal is to keep hips level with or slightly above knees, opening the hip angle and reducing lumbar pressure.
Step 2: Set seat depth. Slide the seat pan forward or back until there’s 2 to 4 inches between the seat edge and the back of the knees. Users should feel support along the full length of the thighs without pressure behind the knees.
Step 3: Position lumbar support. Adjust the lumbar pad height so it contacts the lower back at belt level, roughly where the spine curves inward. If the chair has depth adjustment, increase firmness until the pad gently pushes the lower back forward, maintaining the natural lordotic curve. It shouldn’t feel like a fist jabbing into the spine: think of it as a hand guiding posture.
Step 4: Configure armrests. Adjust height so forearms rest lightly on the pads with shoulders relaxed, not elevated or hunched. Elbows should form a 90-degree angle. If armrests prevent the chair from sliding under the desk, adjust width or remove them entirely. Poor armrest positioning causes more problems than it solves, similar to how improper tool setup leads to inaccurate cuts in woodworking.
Step 5: Set recline tension. Adjust the tilt tension knob so reclining requires slight effort but doesn’t feel locked. The backrest should support the spine when leaning back without forcing the user to push hard. Some ergonomists recommend a slight recline (100 to 110 degrees) during focused work to reduce disc pressure.
Step 6: Check monitor height and distance. The chair is only part of the equation. The monitor’s top edge should sit at or slightly below eye level, 20 to 28 inches from the face. Monitors placed too low cause forward head posture, negating even the best lumbar support.
Re-evaluate setup after a week. Bodies adapt to new positions, and initial settings may need fine-tuning. Small adjustments, a quarter-inch change in seat height or lumbar depth, can make a surprising difference in comfort over an eight-hour day.